
5 Syntax of ‘.rmd’ files
The base document for the report is written in ‘Report Markdown’ (RMD). The file extension for ‘Report Markdown’ files is ‘.rmd’, which is not to be confused with ‘R Markdown’ files which typically have the extension ‘.Rmd’.
5.1 Markdown
Report markdown is an extension of the Markdown language. The Markdown syntax provides basic functionality to represent:
- Normal text
- Numbered section and subsection headers
- Itemized and numbered lists
- Certain font properties (bold, italic, etc.)
Please refer to the Markdown cheat-sheet for more information on this syntax.
5.2 Mathematical expressions and Greek symbols
Report markdown (RMD) supports mathematical expressions and subsequently Greek and other symbols. Mathematical expressions need to be written in the LaTeX syntax. Inline mathematical expressions need to be enclosed in $ signs. ‘Stand-alone’ mathematical expressions need to be enclosed in $$ signs. An example is shown below:
- This is an inline equation:
$y=\sum_{i=1}^n g(x_i)$ This is a ‘stand-alone’ equation:
$$y=\sum_{i=1}^n g(x_i)$$
5.3 Title page
There is a specific RMD command for the definition of the contents of a title page. For the default style it looks as follows (example as in the ZIP file):
=====
TITLE:    Example report illustrating functioning of IQReport
SUBTITLE: Totally based on Fake Data
DATE:     dd-Mmm-yyyy
TEMPLATE: DefaultStyle.rmdt
=====
This command must appear as first element in an ‘*.rmd’ file and is only allowed to appear once. Different template styles might have additional information in the title definition (e.g. Authors, Version, Status, Document Type, etc.). The common element (and the only one that is required is the TEMPLATE information. Thus, also the following title definition would be acceptable (TITLE, SUBTITLE, and DATE would be set to default values):
=====
TEMPLATE: DefaultStyle.rmdt
=====
If an RMD file does not contain a title definition, the above will be used as default one.
5.4 Approvals page
The RMD command !APPROVALS allows to add a custom approvals / signature page after the title page. In the default style this functionality is not included and the !APPROVALS command will be ignored. Custom built templates can include such a feature. The command can be located at any position in the ‘*.rmd’ file after the title definition.
5.5 Removing the ‘Intro’
In some cases, the user might not want a title page, table of contents, lists of tables and figures. If the RMD command !NOINTRO is located anywhere in the RMD document, then these ‘Intro’ information are removed from the Word file.
5.6 Page break
The command !NEWPAGE inserts a page-break into an RMD document. There must be empty lines before and after this command.
5.7 Page orientation (Portrait and Landscape)
The command !LANDSCAPE switches to landscape and the command !PORTRAIT to portrait page orientation.
- It is assumed that the first page is always in portrait mode.
5.8 Commented lines in an ‘.rmd’ document
RMD documents can contain meta-information that is not desired to be included in the generated Word file. Examples are comments or sections of the document that should be kept in the ‘.rmd’ document but are to be commented out in the Word file.
- The character
%used as the first character in a line will comment out the complete line.
5.9 Un-numbered headings
By default, all headings and sub-headings are numbered. It is sometimes useful to allow for un-numbered (sub)headings. This can be accomplished by the RMD command #* for a level 1 section and ##* for a level 2 section, etc.
5.10 Word style comments
Word style comments can be added to an RMD document by the RMD command !COM. An example is the following:
!COM(This is a comment that will appear in Word on the side bar of a document)
These comments need to be on a separate line in the RMD file. They cannot be used as inline with text.
5.11 URLs
URLs can be included into an RMD document by the RMD command @URL. The syntax is as follows:
@URL[caption](link)
The caption is optional. In case the caption is not provided, the link will be used as caption. An example is the following:
@URL(http://www.google.com)
or
@URL[Search Page](http://www.google.com)
5.12 Including external objects
- IQReport can process graphics in PDF, PNG, JPG, and GIF format.
- Text files can be included (these text files will not be processed as RMD code but rendered in Word as present on the disk – useful for log files, text-based analysis results, analysis scripts, etc.).
- Table import to Word is realized by importing text files that contain the desired table in a custom format. As most of our users use R to generate information to be reported, we provide an R library in the IQReport installation folder (see Section 7) that makes the generation of such table text files seamless. Any data frame or R matrix can directly be exported into the required format and included into Word by IQReport.
5.12.1 Timestamp and compliance information
Using the IQRoutput* functions of the provided IQReport R API (or using IQRtools) with activated compliance mode leads to the generation of compliance log files. The information in the log files is used to trace back the time of generation, path to the source file, and script for the respective file. Whenever a log-file exists, the file-name, script-name and date of creation are included beneath the object in the Word fie.
5.12.2 Including text files
Whole text documents can be included into the report using the command:
!TXT[optionalArguments](textFilePath)
Optional arguments: caption, size, label, style, ignoreCompliance
Example:
!TXT[caption:My caption for the text - when label is defined then the caption is numbered,size:10, label:textlabel3](material/text.txt)
The specified caption is added above the text in the file found under ‘material/text.txt‘ and the text itself is added using 10pt font-size. The character string to be used for cross-referencing is specified as label. The user can define other Word styles to use, if these styles are defined in the Word document – this is done using the optional option style argument. The label can have a max length of 40 characters. If ignoreCompliance is set as ignoreCompliance:true, information available in a
log file will not be rendered in the Word document.
5.12.3 Including figures and PDFs
Figures in PNG, GIF, PDF, or JPG format can be included using the command:
!FIG[optionalArguments](figurePath){optional figure legend}
Optional Arguments: ignoreCaption, crop, scale, caption, label, center, pages (if multi-page PDF file), ignoreCompliance
- ignoreCaption:true will not produce a figure caption and a figure number (default: false)
- crop:true will crop whitespace around the figure (default: true)
- scale:90 will scale the figure to x% of the page width (default: 100)
- caption:captionText Caption text for the figure. “caption:” identifier can be omitted if caption provided as first argument. (default: default caption text). The caption is placed in front or after the figure in the Word file, depending on the used Word template.
- label:figLabel defines a label that can be used for cross-referencing (default: no label)
- center:true defines is a figure is centered horizontally or left aligned. (default: true)
- pages:1 2 3 6- providing page numbers to include as figures under same caption. Only works for multi-page PDFs.
- ignoreCompliance If
ignoreComplianceis set asignoreCompliance:true, information available in a log file will not be rendered in the Word document.
If several !FIG commands come after each other at least am empty line needs to be between these elements in the RMD file.
Example:
!FIG[caption: My chosen caption ,crop:false, scale:75, crop:true, label:Figurelabel3], (material/fig1.png){ This is a legend }
Inclusion of the plot ‘fig.png‘ with a specified caption. With the option crop:false the blank space around the figure is not removed and scale:75 then sets the width of the figure to 75% of the Word document width. The legend written in curly brackets is added under the figure.
5.12.3.1 Including multi-page PDF documents
The inclusion of PDFs is possible using two different methods.
!FIG[pages:1 3 5-7](material/fig2.pdf)!PDF[pages:1 3 5-7](material/fig2.pdf)
With the optional argument pages specifying the chosen pages for inclusion in the .pdf document, in this case page 1,3,5,6, and 7.
The main difference between the !FIG and !PDF command is that by default !PDF will not include a caption and a figure number.
As with !FIG, if several !PDF commands come after each other at least am empty line needs to be between these elements in the RMD file.
As of now it is not possible to place figures next to each other - which can, however, be handled when generating the figure files and thus is not a limitation. The other optional arguments are to be used as specified under the inclusion of figures.
5.12.4 Including tables
The inclusion of tables requires the tables to be in a specific format saved in a .txt file. An example for the contents of such a table text file is the following:
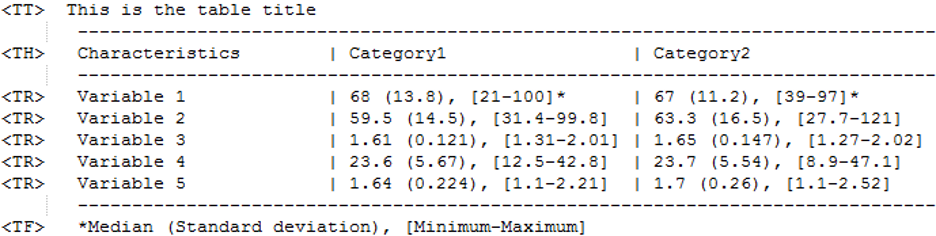
The table content is specified using the row names
<TT>for the table title,<TH>for the table row containing column headers (required),<TR>for table rows (required) and<TF>for the table footer (optional).
In the example above the lines without these tags do not serve any purpose for parsing the table files.
If the IQReport R API (see Section 7) or IQRtools is used, data frames and matrices can be exported to the explained format using the function IQRoutputTable().
The table can then be included using the command:
!TAB[optionalArguments](tableFilePath)
With the optional arguments: caption, label, size, style, ignoreCompliance
If ignoreCompliance is set as ignoreCompliance:true, information available in a
log file will not be rendered in the Word document.
Example:
!TAB[caption:This is the table title, size:8,label:tableref1] (material/table.txt)
In this case the caption specified in the .txt file is overwritten. The table is included with 8pt font-size. The label tableref1 might be used for cross-referencing. Other table styles can be selected using the option style. If style is defined, then this table style needs to be present in the Word template.
Line breaks in table cells
Line breaks cannot be coded in arbitrary table cells. This is a limitation from markdown and Pandoc now. What can be done is to define line breaks in the table footer text (following the <TF> tag). Line breaks here can be coded by either the <br> tag or the \n character.
5.12.5 Including formatted tables (DOCX)
The formatting with Markdown tables is fairly limited. Merging of cells is not possible, etc. Essentially, Markdown tables are limited to a NxM grid with minimum flexibility (which typically is enough though). Tables in any complexity can be added by 1) developing these tables in Word using the table functionality, 2) saving one such table in a single DOCX file, and 3) including this table using the RMD command
!TAB[optional arguments] (material/table.docx)
One table per docx file.
5.12.6 Including value tables
Value tables allow the referencing of values in the table in text passages. To do so a value table requires the presence of a “value” and a “label” column. The overall set-up of value tables is identical to normal tables.
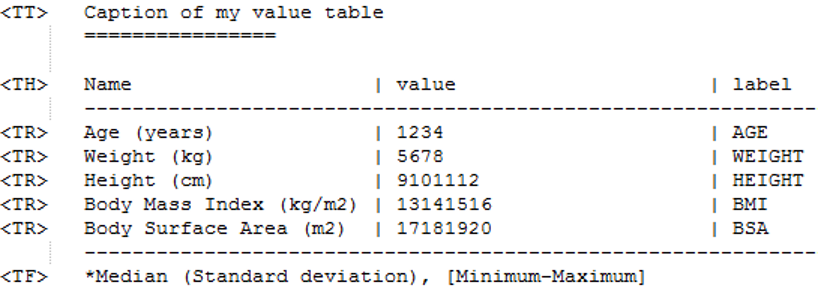
A value table needs to be included in the report document (typically in the Appendix) and is specified by setting the option valueTable to true:
!TAB[valueTable:true, label:valuetable1](material/valuetable.txt).
Optional Arguments include: caption, label, size, and style and are specified as described under section 5.12.4.
In case the user would like to override the default names for the value and label columns in valueTables, this can be done by the optional arguments: VTlabel and VTvalue.
The power of value tables and their use is explained below in the cross-referencing section.
Example
!TAB[valueTable:true, label:valuetable1, VTlabel:newNameLabelColumn, VTvalue:newNameValueColumn](material/valuetable.txt).
5.12.7 Including RMD files
In certain cases it can be useful to be able to include an RMD file into the main RMD file. The following command allows to do this:
!INCLUDE(path_to_RMD_file)
This includes the selected RMD file at the desired location. If title information is present in the included RMD file it will be removed prior to inclusion.
It is also possible to indent the headings in the included RMD file. This can be accomplished by the following command:
!INCLUDE(path_to_RMD_file,indent_section_count)
indent_section_count is an integer, defining
the indentation of headers in the included RMD file. If not provided it is 0 by default.
5.13 Non-breaking spaces
Non-breaking spaces can be added by the !~ RMD command.
5.14 Cross-referencing elements
Cross-referencing is used to improve readability of the report. All cross-referenced objects need to have a specified label.
5.14.1 Cross-referencing Sections
Sections can be cross-referenced if a label was introduced for the specific section before as shown below:
# Section header {#sectionlabel}
Later referencing is then executed with the following commands:
@SEC(sectionlabel)
@SEC[my customized caption](sectionlabel)
If no caption is provided ‘Section x.y’ will be shown in the text. If a caption is provided, this caption will be shown. The cross-reference is hyper-linked.
5.14.2 Cross-referencing Figures, Text and Tables
Figures, Texts and tables are all cross-referenced using the same schemata:
- For text:
@TXT[caption](label) - For figures:
@FIG[caption](label) - For tables:
@TAB[caption](label)
Caption is optional and specifies alternative text to show instead of the automatically assigned caption with number (e.g. Text 1, Figure 1, Table 1…). As label, the label assigned to the respective object at inclusion need to be used.
Numbering of figures, tables, and texts can be sequential (Figure 1, Figure 2, etc). It can also be based on section number and number of elements in this section (Table 2-1, Table 5-1, etc). The choice of the numbering system is made in the definition of the Word style template for IQReport.
Example:
!FIG[caption: My chosen caption ,crop:true,scale:75,crop:true,label:Figurelabel3], (material/fig1.png){ this is a typical legend }
Cross-Reference:
@FIG(Figurelabel3)
Or
@FIG[see this cool figure](Figurelabel3)
5.14.3 Cross-referencing Table Cells and Value Tables
While writing the report it might be necessary to include content of table cells of tables and value tables in-line. Table content is referenced by stating the row and column of the respective cell. However, if the content changes the reference is not updated. In this case value tables are a better choice. Here, the label of the respective value is referenced. With changing table content the inline reference is updated.
- For tables:
@VAL[row*,column](tablelabel)*header rows are not counted - For value tables:
@VAL[label of value to be referenced](label of value table)
The following examples refer to the table and valueTable shown under the inclusion of tables and value tables (see sections 5.12.4 and 5.12.5):
This is the value found for Category1 and Variable2 in the text: @VAL[2,2](tableref1).
This is the value found for Category1 and Variable2 in the text: 59.5 (14.5), (34.4-99.8).
The value @VAL[AGE](valuetable1) corresponds to the label AGE in the referenced value table cell.
The value 1234 corresponds to the label AGE in the referenced value table cell.